
Arm Optimize™ Program
Essential Tools
Equipment that earns its place
Practical tools for alignment, stability, movement, and purposeful arm use throughout the program.
Course videos and printable files open on September 21, 2026
Everything stays locked until then, including for members. Sign in and your access will be waiting on release day.
Opens today
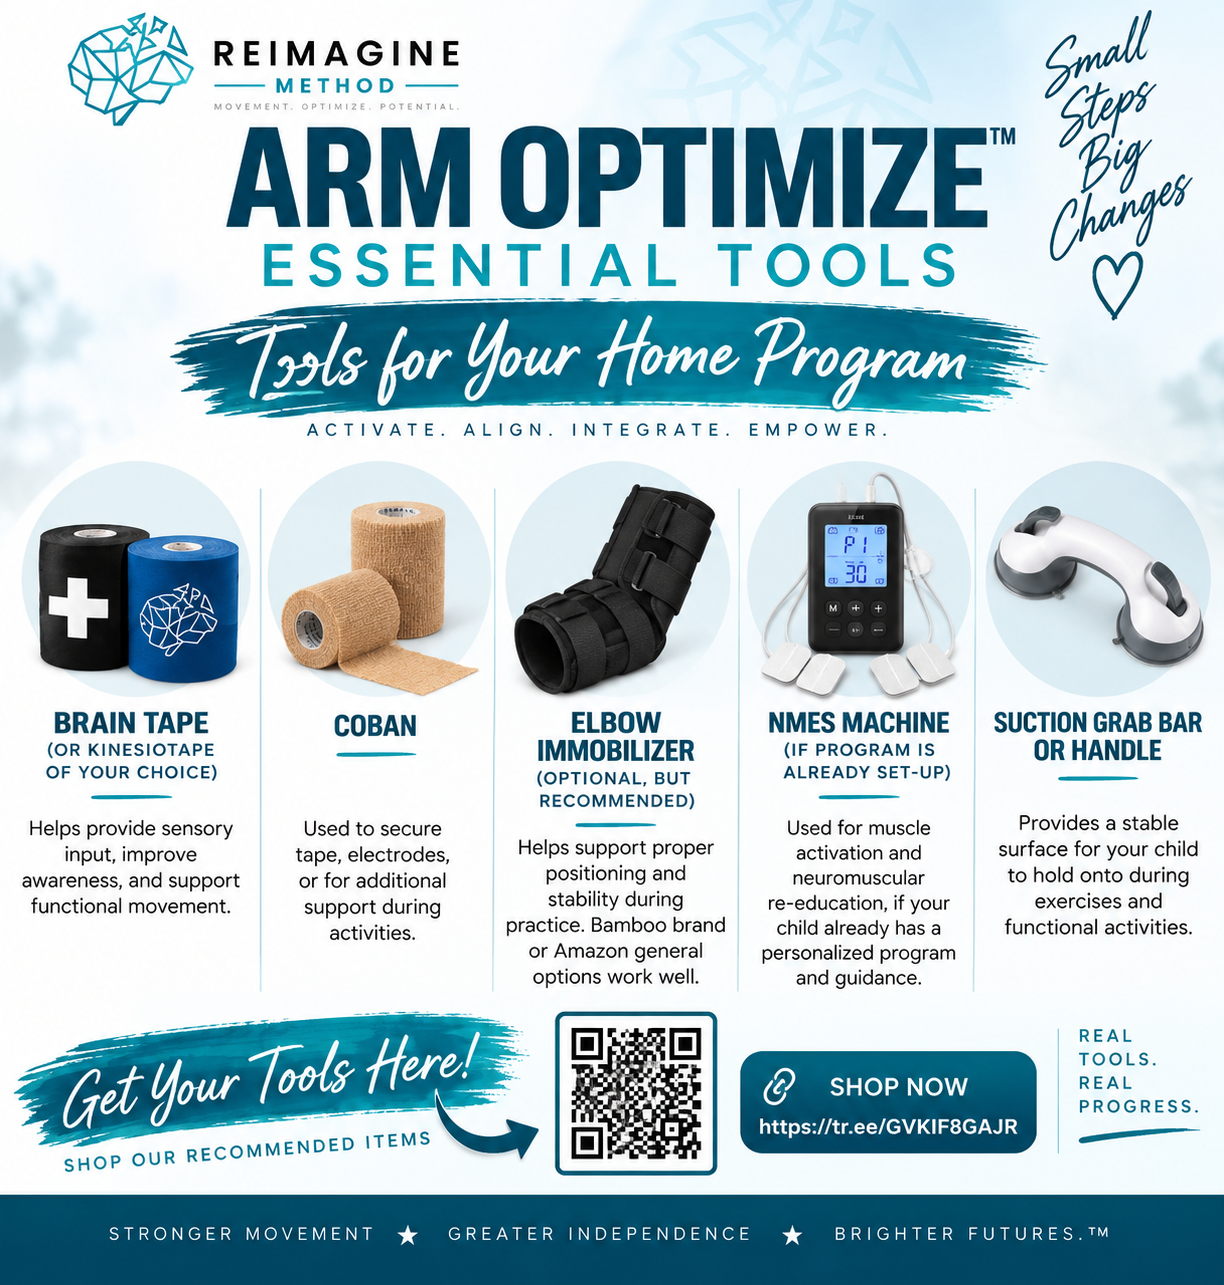
Brain Tape / Kinesiotape
Cues attention to the limb and supports alignment without restricting movement. Our first choice for waking up a quiet arm.
When it's used
Applied at the start of the activation block; worn through daily practice.
PurchaseCoban Self-Adherent Wrap
Light compression gives constant proprioceptive input and keeps taping and padding in place through active work.
When it's used
Wrist and forearm support during weight-bearing and heavy work.
PurchaseElbow Immobilizer
A simple constraint for CIMT blocks — restrains the stronger arm so the affected arm has to solve the task.
When it's used
Timed constraint blocks inside the motor control session.
PurchaseNMES Unit
The hardware behind functional NMES and EMG-triggered work. Stimulation paired with intent, never passive twitching.
When it's used
Activation and motor control blocks, matched to the task being trained.
PurchaseSuction Grab Bar / Handle
Creates a safe pull-and-hold anchor anywhere — bath, wall, table edge — for grasp endurance and postural work.
When it's used
Sustained grasp, heavy pull, and personal-care carryover at home.
PurchaseThe Arm Optimize Kit
The official kit — everything the intensive needs, in one checkout.
Program tool guides
See what to gather for practice
Use these visual guides to identify the core program tools and low-cost Week 1 practice supplies.
Brain Tape pattern options
Choose the Black Cross Pattern or the Blue Brain Logo Pattern. Buy 3 rolls, get 1 free.
Everything together in one toolbox
Purchase the Arm Optimize Essentials Kit directly, or use the guides to gather comparable items individually.
Clinical protocol
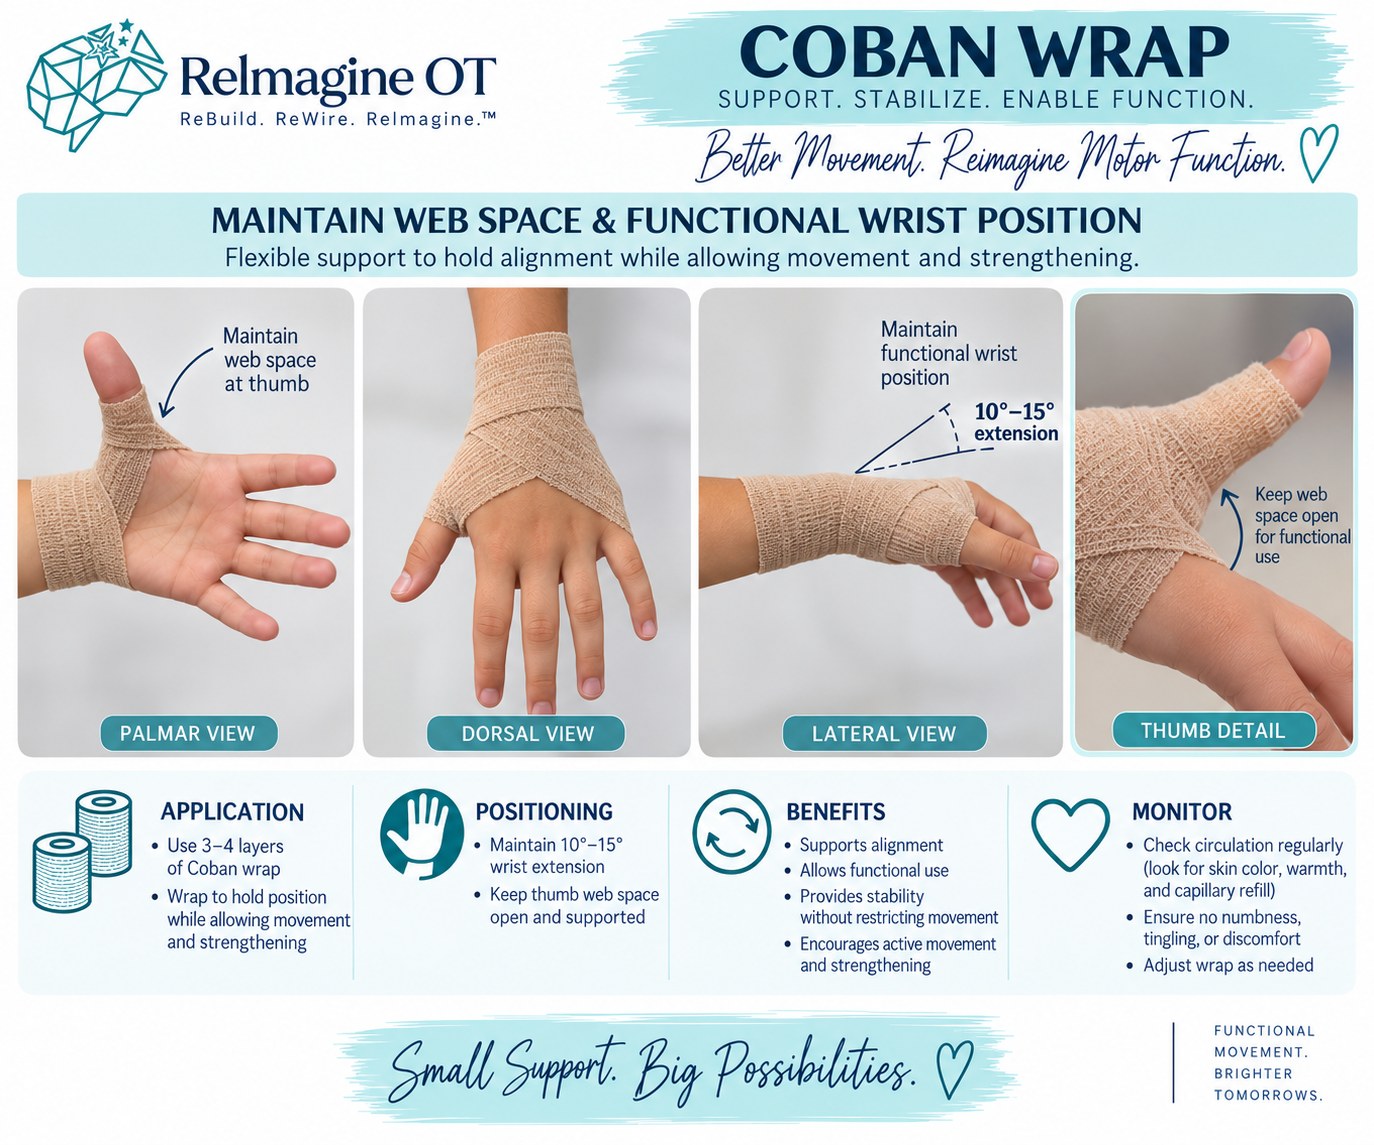
Coban Wrap — Maintain Web Space & Functional Wrist Position
Flexible support that holds alignment while still allowing movement and strengthening. Used in Week 1 and Week 2 under activation, weight-bearing, and heavy work.
Support. Stabilize. Enable function.
Application
- Use 3–4 layers of Coban wrap
- Wrap to hold position while allowing movement and strengthening
Positioning
- Maintain 10°–15° wrist extension
- Keep the thumb web space open and supported
Benefits
- Supports alignment
- Allows functional use
- Provides stability without restricting movement
- Encourages active movement and strengthening
Monitor
- Check circulation regularly — skin colour, warmth, capillary refill
- Ensure no numbness, tingling, or discomfort
- Adjust the wrap as needed
Clinical safety — read before wrapping
Coban wrapping is a clinical technique. Apply it only under the guidance of a licensed occupational or physical therapist, and never wrap a child who cannot tell you how their hand feels without checking circulation every few minutes.
Circulation check — every 10–15 minutes
- Capillary refill: press the fingernail, release, and colour should return in under 2 seconds
- Skin temperature: the wrapped hand should feel as warm as the other hand
- Colour: no blue, purple, grey, white, or mottled skin
- Swelling: no puffiness in the fingers, knuckles, or above the wrap
- Sensation and movement: the child can still feel touch and move the fingers
Stop immediately and remove the wrap if you see
- Numbness, tingling, or pins and needles
- Blue, purple, pale, or blotchy skin
- Throbbing, aching, or increasing pain
- Cold fingers or capillary refill slower than 2 seconds
- Swelling, or fingers that will not move
- Crying, pulling at the wrap, or refusing to use the hand
What to do next
- 1.Remove the wrap immediately — do not wait to see if it settles
- 2.Warm the hand gently and recheck colour, warmth, and capillary refill
- 3.Contact your licensed occupational therapist before re-applying
- 4.Seek medical care from a physician if symptoms do not resolve quickly
Optional add-ons
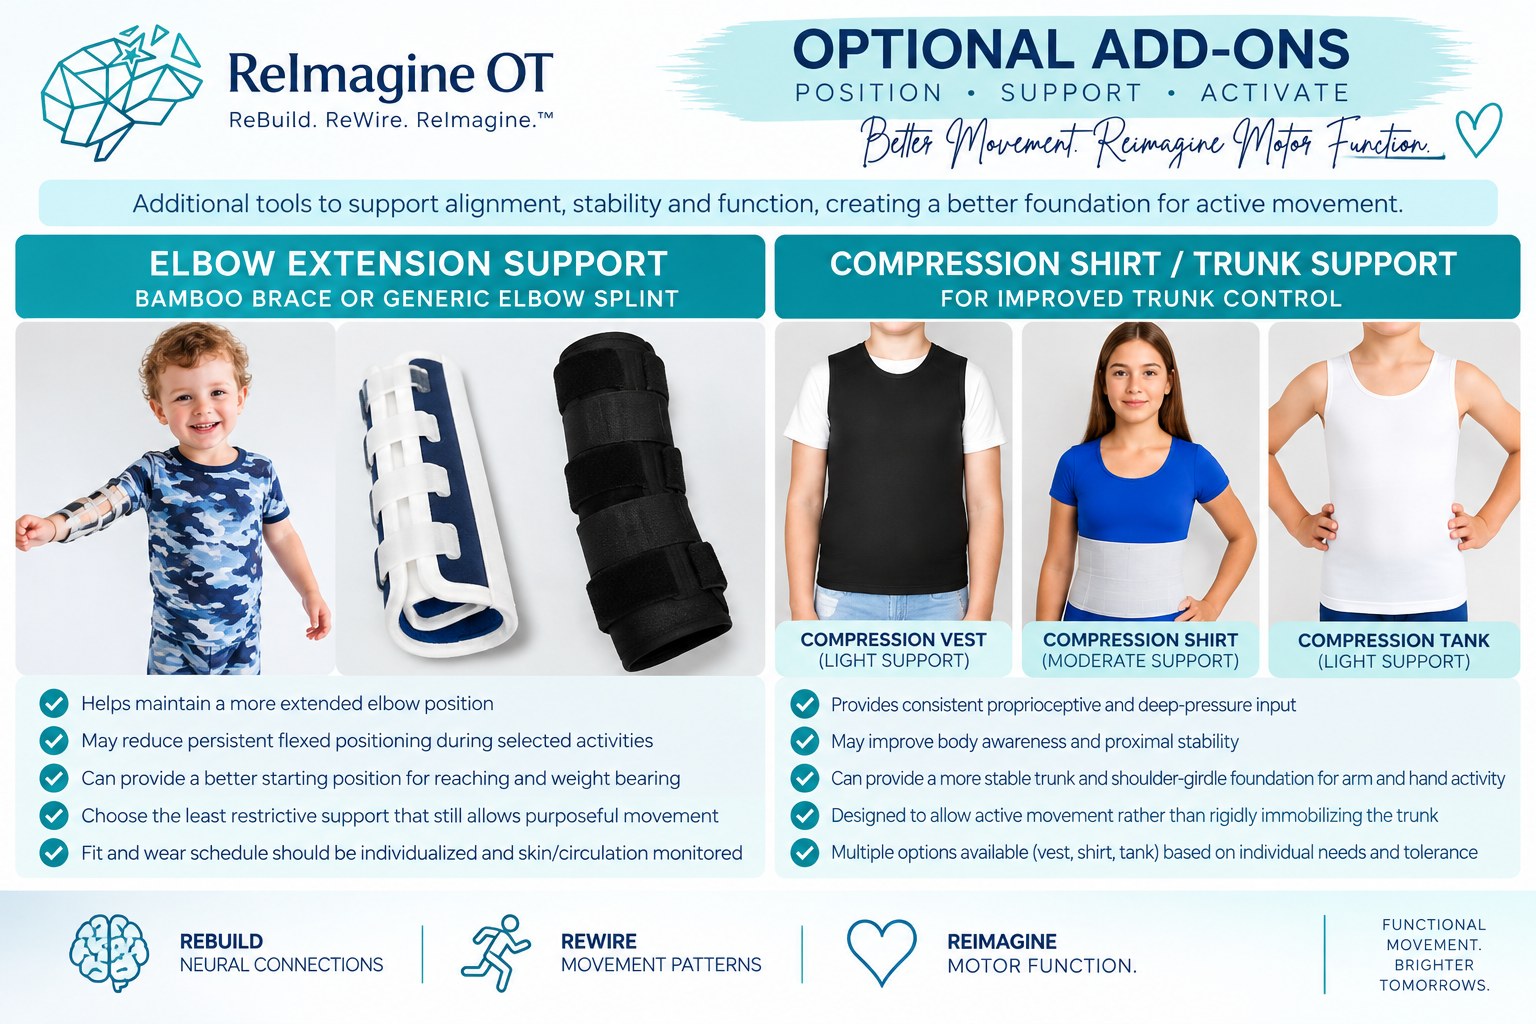
Optional Add-Ons — Position • Support • Activate
Additional tools that support alignment, stability, and function, creating a better foundation for active movement.
Elbow Extension Support
Bamboo brace or generic elbow splint
- Helps maintain a more extended elbow position
- May reduce persistent flexed positioning during selected activities
- Can provide a better starting position for reaching and weight bearing
- Choose the least restrictive support that still allows purposeful movement
- Fit and wear schedule individualized; monitor skin and circulation
Compression Shirt / Trunk Support
Vest, shirt, or tank for improved trunk control
- Provides consistent proprioceptive and deep-pressure input
- May improve body awareness and proximal stability
- Can give a more stable trunk and shoulder-girdle foundation for arm and hand activity
- Designed to allow active movement rather than rigidly immobilizing the trunk
- Multiple options based on individual needs and tolerance
DIY equipment
Build the PVC pipe pushcart
A four-sided, three-level grip frame for supervised push, pull, grasp, weight-bearing, and stability practice.
Finished dimensions
48 in high × 36 in wide × 12 in deep (122 × 91 × 30 cm). Built from 1¼-inch PVC without wheels.
Fittings and supplies
- 24 × 1¼-inch 90° PVC elbows
- 8 × 1¼-inch 90° PVC tees
- 16 × 1¼-inch end caps
- Medium- or heavy-duty PVC cement
- Measuring tape and marker
- PVC pipe cutter or hacksaw
| Quantity | Length | Use / location |
|---|---|---|
| 4 | 48" | Vertical corner uprights |
| 6 | 36" | Front and back rails — top, middle, bottom |
| 6 | 12" | Side rails — top, middle, bottom |
| 4 | 12" | Bottom-frame inside supports |
Assembly steps
- 1
Build the top frame
Join two 36-inch rails and two 12-inch side rails with elbows to form a rectangle.
- 2
Build the middle frame
Repeat the rectangle and use tees to position this grip level 24 inches from the base.
- 3
Build the bottom frame
Make the third rectangle and add the four 12-inch inside supports for a wider, steadier base.
- 4
Attach the uprights
Seat the four 48-inch vertical pipes at the corners, connecting all three levels with the tees and elbows shown in the plan.
- 5
Cap open ends
Place end caps on every exposed opening and smooth all cut edges.
- 6
Check, cement, and cure
Square the frame, fully seat every joint, cement according to the product directions, and allow the full stated cure time before use.
Adult assembly and safety checks
- An adult must measure, cut, sand, assemble, and apply cement in a well-ventilated area using the manufacturer's precautions.
- Allow PVC cement to cure completely before a child touches or uses the frame.
- Use only on a flat, dry, non-slip surface with direct adult or clinician supervision; this frame has no wheels and is not a mobility device.
- Before every session, press on all sides to check stability and inspect for cracks, sharp edges, loose caps, or separating joints.
- Stop immediately if the frame shifts, bends, cracks, or causes pain, distress, loss of balance, or unsafe arm positioning.
Guides & downloads
Printable course guides
Print these and keep them with the equipment — the walkthrough, the activity options by stage, and the daily tick sheet.
Parent Intensive Programs
Learn, practice, and build functional skills into everyday routines.
Parent Instructional Course — Print Guide
The full parent-facing walkthrough of the four-week plan, ready to print and keep beside the practice space.
Available September 21, 2026
Parent Instructional Course — Print Guide (PDF) — Opens today
Developmental Activity Bank
Activity options organised by developmental stage, so practice can be matched to what the child can do today.
Available September 21, 2026
Developmental Activity Bank (DOCX) — Opens today
Daily Implementation Checklist
A one-page daily tick sheet covering each practice block, tool use, and rest breaks.
Available September 21, 2026
Daily Implementation Checklist (PDF) — Opens today
Week 1 Quick Guide & Course Materials
The Week 1 activation, stability and practice reference for use alongside the demonstration videos.
Available September 21, 2026
Week 1 Quick Guide & Course Materials (PDF) — Opens today
Palmar Grasp Activity Card
Whole-hand grasp practice with simple setup and progression cues.
Available September 21, 2026
Palmar Grasp Activity Card (PDF) — Opens today
Radial-Palmar Grasp Activity Card
Thumb-side grasp practice that builds early object control.
Available September 21, 2026
Radial-Palmar Grasp Activity Card (PDF) — Opens today
Radial-Digital Grasp Activity Card
Finger-and-thumb control activities for more precise handling.
Available September 21, 2026
Radial-Digital Grasp Activity Card (PDF) — Opens today
Inferior Pincer Activity Card
Early thumb-and-index pinch activities using safe, supervised objects.
Available September 21, 2026
Inferior Pincer Activity Card (PDF) — Opens today
Neat Pincer Activity Card
Refined fingertip pinch activities for small-object control.
Available September 21, 2026
Neat Pincer Activity Card (PDF) — Opens today
Raking & Transition Grasp Activity Card
Activities that support the transition from raking to more isolated finger use.
Available September 21, 2026
Raking & Transition Grasp Activity Card (PDF) — Opens today
Dynamic Tripod Grasp Activity Card
Mature pencil-grasp activities supporting controlled drawing and writing.
Available September 21, 2026
Dynamic Tripod Grasp Activity Card (PDF) — Opens today
Clinician documentation
Clinical documentation sheets
The evaluation forms, checklists, and decision trees used across the 6 Pillars. These are member-only clinician documents — titles and purpose are shown to everyone, the files themselves need your access code.
Arm Optimize Evaluation Form
Baseline evaluation of alignment, tone, active range, and functional use.
Opens September 21, 2026 — Opens today
Body Prep Decision Tree Checklist
Decide what body preparation a child needs before active practice.
Opens September 21, 2026 — Opens today
Brain Tape Checklist
Taping application, skin checks, and wear schedule.
Opens September 21, 2026 — Opens today
Functional Awareness Technique Checklist
Techniques that build attention to and awareness of the involved limb.
Opens September 21, 2026 — Opens today
Baseline Video Guide
How to film comparable before/after functional clips.
Opens September 21, 2026 — Opens today
Proximal Stability Checklist
Screen trunk, scapular, and shoulder-girdle stability.
Opens September 21, 2026 — Opens today
CIMT Candidate Checklist
Screen suitability, dosing, and precautions for constraint-induced practice.
Opens September 21, 2026 — Opens today
Movement Analysis Checklist
Break a functional attempt into components and name the limiter.
Opens September 21, 2026 — Opens today
Functional Goal Bank
Measurable, family-meaningful goals by functional domain.
Opens September 21, 2026 — Opens today
Motor Control Progression Planner
Sequence support, range, and speed as control improves.
Opens September 21, 2026 — Opens today
Functional NMES Documentation Template
Document parameters, placement, tolerance, and functional pairing.
Opens September 21, 2026 — Opens today
Electrical Stimulation Checklist
Screening, contraindications, and session-by-session safety checks.
Opens September 21, 2026 — Opens today
Orthotic Purpose Worksheet
State the purpose, wear schedule, and review date for every orthosis.
Opens September 21, 2026 — Opens today
Bimanual Task Bank
Two-handed tasks graded from stabilizer role to full participation.
Opens September 21, 2026 — Opens today
4-Week Treatment Planner
Lay the intensive out across four weeks by pillar and priority.
Opens September 21, 2026 — Opens today
Daily Progression Plan
Daily structure, dosing, and progression criteria.
Opens September 21, 2026 — Opens today
Weekly Progress Review
Review the week, adjust dosing, and reset priorities.
Opens September 21, 2026 — Opens today
Need help using the equipment?
Book a private 1-on-1 session
An Arm Optimize Coach walks you through setup, fit, and daily use. An Arm Optimize Therapist reviews handling, dosing, and progression.
Clinical consultation with a licensed therapist
- 50 minutes, 1-on-1
- Private video session, scheduled by email
Clinical reasoning, movement analysis, and protocol progression stay with a licensed therapist. This session is for the decisions that change a plan.
What this session covers
- Clinical caseload consultation and case review
- Individualized movement analysis from your video
- Clinical protocol progression across the 6 Pillars
- Handling, positioning, and dosing adjustments
- Precautions, red flags, and referral decisions
Scope of this session
- Not included: A diagnosis or a substitute for your child's own treating therapist
Implementation support for the plan you already have
- 50 minutes, 1-on-1
- Private video session, scheduled by email
A coach helps you carry out a therapist-approved plan: pacing, setup, and accountability. Coaches do not change clinical decisions — they flag concerns and refer back to your therapist.
What this session covers
- Implementation support for your current home plan
- Daily home practice pacing and realistic scheduling
- Equipment and kit usage guidance
- Accountability and routine check-ins
- Troubleshooting setup, motivation, and reps
Scope of this session
- Not included: Changing protocols, dosing, or clinical decisions — those go to a therapist
Important disclaimer
Arm Optimize™ is a private, out-of-pocket educational and therapeutic coaching program. It is not billed to health insurance or any national health service, and it does not replace in-person skilled therapy intensives, medical diagnosis, or hands-on physician care from your local providers.
Product safety & adverse reaction notice: If a child experiences discomfort, skin irritation, redness, circulatory changes, or an allergic response to kit tools (Coban, tape, straps, or therapy equipment), remove the item immediately, stop using it, and contact your pediatrician. Call emergency services for severe swelling, breathing difficulty, or a hand that stays pale, blue, cold, or numb.